Motor drives are a ubiquitous technology for transforming the constant voltage from the main ac power supply into a voltage that varies to control motor torque and speed ideal for motors that are driving mechanical equipment loads. Motor drives provide higher efficiency that simple online motors and a degree of control not available on simple directly driven motors. These factors result in energy cost saving, higher production performance and extend the life of the motor.
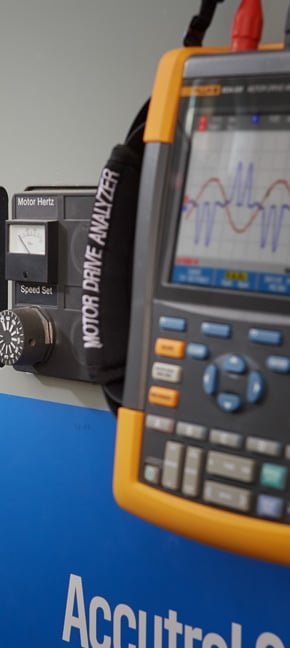
Electric motor systems account for about 60% to 70% percent of industrial electricity consumption and about 15 percent of final energy use in industry worldwide (IEA). Not surprisingly, motor drives are commonly used in many industries and facilities. To ensure uptime in these motor systems, maintenance and troubleshooting is a priority.
Challenges to testing motor drives
Troubleshooting and testing motor drives, also known as variable frequency drives (VFD), variable speed drives (VSD) or adjustable speed drives (ASD), is often performed by specialists using several test instruments, including oscilloscopes, multimeters or other tools. Such testing can involve a degree of trial and error, using the age-old process of elimination. Due to the complexity of the motor systems, testing often occurs annually unless a system begins to fail. Determining where to begin testing can be problematic considering there is usually a lack of, or incomplete, work history for the equipment. This includes documentation of specific tests and measurements performed previously, work completed or the as-left condition of individual components. Advances in testing technology have eliminated some of the challenges. Newer instruments, such as the Fluke Motor Drive Analyzers (MDA-510 and MDA-550) are designed to make motor drive testing more efficient and insightful with of the capability to document the process at each step along the way. These reports can be stored and compared against subsequent tests to get a bigger picture of motor drive maintenance history.
An easier way to troubleshoot VFDs
Combining the functions of a meter, handheld oscilloscope and recorder with the guidance of a skilled instructor, these advanced motor drive analyzers employ on-screen prompts, clear setup diagrams, and step-by-step instructions written by motor drive experts to guide you through the essential tests. This new method to break down and simplify complex testing enables an experienced motor drive specialist to work quickly and with confidence to get the detail they demand. It also provides a quicker path for less experienced technicians to start motor drive analyses.
Getting to the root cause of a motor drive system failure or performing a routine preventive maintenance check is best done with a set of standard tests and measurements at key points within the system. Beginning with the power input, key tests with different measurement techniques and evaluation criteria are completed throughout the system, ending at the output.
Here are essential tests for troubleshooting motor drives:
(Note that the Fluke Motor Drive Analyzers guide you through these tests and automate many of the needed calculations so you can have confidence in the results. Plus, you can save data to a report at nearly any testing point so you can have documentation to upload to a computerized maintenance management system (CMMS) or share with a colleague or consulting expert.
Safety note: Remember to always read product safety information before you begin testing. Do not work alone, and comply with local and national safety codes. Use personal protective equipment (approved rubber gloves, face protection, and flame-resistant clothes) to prevent shock and arc blast injury where hazardous live conductors are exposed.
To begin each test with a Fluke Motor Drive Analyzer simply connect the test probes according to the diagram, then press Next.
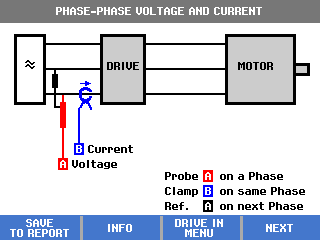
1. Drive Input
Analyzing the power going into the motor drive is an excellent first step to determine if a feeder circuit to the drive has distortion, disturbance or noise that may be affecting power ground.
Tests
Compare the drive’s nominal rated voltage to the actual supplied voltage to quickly see whether values are within acceptable limits. More than 10% out of range could indicate a supply voltage problem. Determine if the input current is within the maximum rating and the conductors are suitably sized.
- Compare measured frequency against specified frequency. More than 0.5Hz difference could cause problems.
- Check whether the harmonic distortion is within an acceptable level. Visually inspect the waveform shape, or view the harmonics spectrum screen which shows both the total harmonic distortion and individual harmonics. Flat-top waveforms, for example, can indicate a nonlinear load connected to the same feeder circuit. If Total Harmonic Distortion (THD) is over 6% there is a potential problem.
- Check the voltage unbalance at the input terminals to ensure the phase unbalance is not too high (less than 6 to 8%) and that the phase rotation is correct. High voltage unbalance reading can indicate phase failure. A reading over 2% can lead to voltage notching and cause a trip of the drive’s overload fault protection or disturb other equipment.
- Test for current unbalance. Excessive unbalance may indicate a drive rectifier problem. A current unbalance reading of over 6% could point to a problem within the inverter of the motor drive and be problematic.
2. DC Bus
The conversion of AC to DC inside the drive is critical. Having the correct voltage and adequate smoothing with low ripple is required for the best drive performance. High ripple voltage may be an indicator of failed capacitors or incorrect sizing of the connected motor. The record function of a Fluke MDA-500 Series Motor Drive Analyzer can be used to check DC bus performance dynamically in the operating mode while a load is applied. Alternately, a Fluke ScopeMeter® Test Tool or advanced multimeter can be used for this test.
Tests
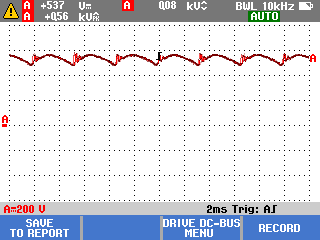
- Determine if the DC bus voltage is proportional to the peak of the input line voltage. Except for controlled rectifiers, the voltage should be about 1.31 to 1.41 times the RMS line voltage. A low DC voltage reading can trip the drive, which can be caused by low input mains voltage or input voltage distortion such as flat topping.
- Check for any distortion or error in peak amplitude of the line voltage. This can cause an over- or under-voltage error. A DC voltage reading +/- 10% % from the nominal voltage can indicate a problem.
- Determine if the peaks of the AC ripple have a different repetition level. After the AC-to-DC conversion, a slight AC ripple component will remain on the DC bus. Ripple voltages above 40V can be caused by malfunctioning capacitors or a drive rating too small for the connected motor or load.
3. Drive Output
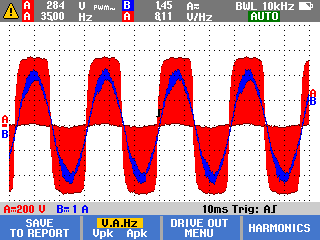
Testing the drive output is critical to proper motor operation and can offer clues to problems within the drive circuits.
Tests
- Determine if the voltage and current are within limits. High output current may make the current run hot, decreasing stator insulation life.
- Check the voltage/frequency ratio (V/Hz) to ensure it is in specified limits of the motor. A high ratio may make the motor overheat; a low ratio will make the motor lose torque. Stable frequency and unstable voltage can point to a DC bus problem; unstable frequency and stable voltage can indicate switching (IGBT) problems. Unstable frequency and voltage indicate potential issues with the speed control circuits.
- Check the output of the drive focusing both on voltage to frequency ratio (V/F), and voltage modulation. When high V/F ratio measurements are experienced, the motor may overheat. With low V/F ratios, the connected motor may not be able to provide the required torque at the load to sufficiently run the intended process.
- Check for voltage modulation using phase-to-phase measurements. High voltage peaks can damage motor winding insulation and cause the drive to trip. Voltage peaks higher than 50% nominal voltage are problematic.
- Check the steepness of the switching impulses indicated by the drive reading. The rise time or steepness of impulses are indicated by the dV/dt reading (rate of voltage change over time) and should be compared to the motor’s specified insulation.
- Test the switching frequency with phase to DC. Identify whether there is a potential issue with electronic switching or grounding, which may be indicated when the signal floats up and down.
- Measure voltage unbalance, preferably at full load. The unbalance should not be more than 2%. Voltage unbalance causes current unbalance, which can result in excessive heat in motor winding. Causes for unbalance can include faulty drive circuits. If a phase shows a failure it is called “single phasing,” which can make a motor run hot, not start after stopping, lose significant efficiency and potentially damage the motor and the connected load.
- Measure current unbalance, which should not exceed 10% for three phase motors. Large unbalance while voltage is low can point to shorted motor windings or phases shorted to ground. Large unbalance can also cause drive tripping, high motor temperatures and burnt windings
4. Motor Input
Voltage supplied at the motor input terminals is key, and cable selection from drive to motor is critical. Incorrect cabling selection can result in both drive and motor damage due to excessive reflected voltage peaks. These tests are mostly identical to those for drive output above.
Tests
- Check that the current present at the terminals is within the motor rating. Over current conditions can cause the motor to run hot and decrease the life of the stator insulation which can result in the early failure of the motor.
- Voltage modulation helps identify high voltage peaks to ground that could damage the motor insulation.
- Voltage unbalance that can seriously affect the life of the motor and may be an indication of a faulty inverter. This can lead to voltage notching and cause tripping the overload fault protection.
- Current unbalance can point to voltage unbalance or drive rectifier problems.

5. Motor Shaft Voltage
Voltage pulses from a motor drive can couple from a motor’s stator to its rotor, causing a voltage to appear on the rotor shaft. When this rotor shaft voltage exceeds the insulating capacity of the bearing grease, flashover currents (sparking) can occur, causing pitting and fluting of the motor bearing race, damage that can cause a motor to fail prematurely.
Test
- Measure the voltage between the motor chassis and the drive shaft. The MDA-550, for instance, provides a carbon fiber brush probe for this purpose. The test can easily detect the presence of destructive flashover currents, while the impulse amplitude and count of events will enable you to take action before failure occurs.

Do you want to learn more?
Fill out our short Demo Request form and we will contact you to schedule your personal demo from a qualified Fluke engineer. You'll get a hands-on demonstration of the instrument in your workplace, focused on the measurements you need. You'll see how easy our instruments are to use, and receive training and advice on both the instrument and related accessories. So, if you buy, you're sure to select the instrument that's right for you, and get the most out of it!
Fluke MDA-500 Series - CTA